Home Improvement

The Silent Guardian of a Home

Roofing is the silent guardian of a home, protecting its inhabitants from the elements. But it is also an evolving entity, undergoing constant changes as new materials are tested.

Learn about the different varieties of roofing and how they differ from each other. Also, discover tips on hiring a roofing contractor for simple repairs or major re-roofing projects. Click here to Learn More.

The roof is an essential part of a building, protecting it from weather and other environmental factors. The design of a roof encompasses a range of elements, from the type of roofing material to its structure. From the gently sloping shingles of a charming cottage to the dramatic pitched copper roofs gracing European cathedrals, every roofing system has its own unique design.

A few popular roofing designs that have stood the test of time include gable roofs, hipped roofs, and barrel vaulted ceilings. Each has its own distinct characteristics and benefits.

For example, gable roofs have a classic, clean-lined look that complements many home styles. Their simple construction makes them easy to maintain. They are also quite effective at shedding snow and rain, which is an advantage in colder climates. Gable roofs are available in a number of styles, including open gable roofs and box gable roofs.

A hipped roof has a more complex construction than a gable roof, but it is still relatively easy to maintain and can withstand wind and rain very well. They are a common choice for homes in many different styles, from traditional Cape Cod houses to sprawling ranch-style homes.

The slope of a roof is often determined by its height, but it can also be adjusted to suit the homeowner’s preference and the architectural style of the house. For example, a steep slope may be used to create a loft space, while a shallow slope is ideal for a sunroom or playroom.

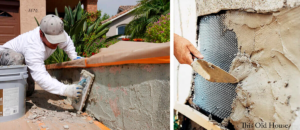
Many roofing systems use underlayment, a waterproof material that goes underneath the sheathing to protect it from moisture damage. Some underlayment is made of felt, while others are made of synthetic materials like rubber or polycarbonate. Flashing is also a common element of a roof, providing sealant at points where the roof changes direction.

Other important elements of a roof’s design include soffits, ridges, and valleys. The eaves are the edges of the roof that meet the walls, while the ridge is the point where two sloping sides of the roof meet at the top. The soffits are the openings in the eaves that allow air to flow freely.

Materials

Roofing materials are the outer protective layer of a building’s structure, shielding it from harsh weather conditions and other environmental factors. There are many different types of roofing material that can be used on a building, ranging from natural products like thatch to commercially manufactured materials such as tiles and polycarbonate sheeting. When choosing the right roof materials, it is important to consider a variety of factors, such as appearance, cost, and durability.

Thatch is a popular roofing material that can be made from a variety of plant stalks in overlapping layers. It is an affordable option that provides good protection, but it does not last as long as other roofing materials. It is also not recommended for cold climates as it can become brittle and break under the stress of extreme temperatures.

Slate is a beautiful and durable roofing material that adds a unique aesthetic to a home’s exterior. It is expensive, however, and requires specialized installation and maintenance.

Concrete tile roofs are a popular roofing material for Mediterranean and Spanish-style homes. They are durable, fire-resistant, and available in a wide range of colors. They are also fairly easy to maintain and can last for over 50 years.

Built-up roofs (BUR) are an older type of roofing that was popular before membrane roofing became more common. It consists of multiple plies of bitumen-coated organic felts or polyester felts. The plies are laminated together with hot asphalt, coal tar, or cold-applied adhesive. BUR is durable and water-resistant, but it can be susceptible to leaks if the seams are not properly sealed.

Rubber roofing is a relatively new roofing material that combines the benefits of both asphalt and shingles. It is lightweight, resistant to ultraviolet rays, and available in a variety of colors. It is also an environmentally friendly option, as it can be made from recycled materials.

Metal roofing is another durable and attractive option that can withstand severe weather conditions. It is available in a variety of styles, from standing seam metal to galvanized steel and an aluminum-zinc alloy called Galvalume. Metal is also available in a range of colors, so it can be easily blended with other roofing materials to create a cohesive look.

Installation

The roof is the tangible outer shield that protects a building, but it’s also a complex system of materials and components that must be installed, maintained, and repaired properly. Learn more about this essential feature of every home in our extensive guide to roofing, including its many varieties, standard warranty offerings, and maintenance tips.

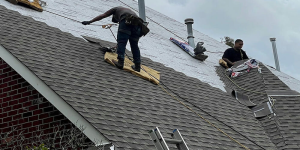
Start by examining your roof, checking for leaks and any other issues that require attention. You’ll want to be sure you have the right safety gear before starting work, such as rubber-soled shoes or boots, protective eyewear, and a hard hat. It’s also a good idea to have a partner working with you, especially when removing old shingles or installing underlayment or vapor retarder.

Next, carefully remove any shingle strips or pieces that are in poor condition and replace damaged flashing. This is particularly important around chimneys, vents, and valleys, where water tends to collect. Once all of the metal is removed, be sure to trash any nails left behind. You may be able to reuse some of the flashing, but you’ll want to make sure all new metal is fully waterproofed and sealed before installing any shingles or other coverings. Also be sure to thoroughly inspect and remove any old caulking or sealant around penetrations, as this can cause leaks.

Maintenance

A building’s roof acts as its shield from the elements, protecting the interior structures and preserving the integrity of the structure. Like any other system, a roof requires regular maintenance to keep it in good condition and extend its lifespan. It is important to inspect the roof regularly to identify small problems that can escalate into major issues if left untreated.

Debris removal

Regularly removing debris like leaves, twigs, and gravel will help prevent the accumulation of moisture on the roof. Standing water can damage the shingles and promote the growth of algae or mold. It is also important to clear the drains of any clogs or blockages.

Roof maintenance inspections should be conducted by trained roofing professionals on a routine basis, preferably on a biannual basis (once in the spring and once in the fall). Regular inspections will ensure that any minor damage or wear and tear is addressed promptly before it has a chance to worsen.

During a roof inspection, a professional should check the following:

Missing or damaged shingles Loose shingles may indicate water leaks. Missing shingles require immediate replacement to avoid further damage and structural failure. Granule loss Loose granules expose the asphalt layer and accelerate shingle deterioration. Clogged gutters and downspouts

Water-damaged fascia boards

Ponding water

Leaks in the attic

Cracks and holes

Damaged vents

Missing or loose caulking

Damage to the underlayment

Leaking ridge cap

A roof’s flashing is an essential component that prevents water from leaking into a building. Flashing around chimneys, vent pipes, skylights, exhaust fans, and air conditioning units should be inspected on a regular basis. If the flashing is showing signs of deterioration, such as openings, gaps, or crazing, it should be repaired immediately.

It is also a good idea to trim tree branches near the roof on a regular basis. Long branches have the potential to scrape or break shingles during heavy storms. Regular trimming also allows sunlight to reach the roof surface, which helps to prevent the growth of moss or other unwanted vegetation.

Home Improvement

Stucco Repair – When to Remediate

Stucco Repair Charleston SC is a durable and attractive wall finish that can last a long time with little maintenance. However, like all building materials it can experience damage from harsh weather.

Simple repair options can help with cosmetic issues, but they will not solve the underlying problems that caused them. For that, you need remediation.

Remediation is the most thorough way to repair stucco, and it’s usually only necessary when a problem can’t be resolved with simple repairs. Remediation involves stripping the sheathing and framing to the core and repairing it with new materials before replacing the stucco. It’s a time-consuming process that can be more costly than simply repairing the stucco, but it ensures that all underlying issues have been addressed and corrected for good.

When it comes to remediation, you’ll want to find a team of specialists with years of experience and a portfolio of successful stucco remediation projects. Doing your research can help you find a company that offers reliable services, excellent client reviews and testimonials, and a warranty on their work. It’s also a good idea to find a company that offers a full range of services for homeowners, from initial assessments to installation and cleanup.

There are a number of problems that can warrant remediation, including water damage, mold and mildew, and improper installation. Other issues can include a lack of maintenance and wear and tear, animal damage, and natural causes such as the sun’s UV rays, rain, or wind.

A full remediation usually includes the replacement of the sheathing and framing that’s been affected by water or mold, and a complete replastering of the walls. During this time, it’s often recommended to install a layer of waterproofing for added protection against future damage.

In addition to replacing the sheathing, framing, and insulation, a remediation job should also address the areas around doors and windows. Typically, these areas have been damaged by water or by a shoddy stucco job, and they’re easy for water to seep into. By addressing these areas before they worsen, you can avoid further expensive damage to your home.

While it’s tempting to use simple repairs as a way of postponing remediation, doing so will only result in further damage. If you’re experiencing any of the signs above, it’s important to contact a stucco specialist as soon as possible. Remediation will not only protect your investment, but it will provide a safe and secure home for you and your family.

Simple Repairs

Stucco is an attractive and durable exterior finish for homes that offers many customization options. It’s a mixture of sand, cement and water that creates a rough surface perfect for unique design expressions. But, like all materials, stucco requires maintenance and occasionally repairs to keep it in good shape.

There are a few warning signs to look for in your home that indicate it’s time to consider a stucco repair project. Hairline cracks, spider shapes or patterns, and discoloration are all indicative that you need to get some repair work done to your stucco.

These kinds of minor damages are a sign that you need to have some caulking or plaster applied to the area in question. If these repairs are done on time, they can help limit the amount of moisture that penetrates into the wall system and causes further damage.

To complete these types of repairs, you’ll need to purchase or gather the correct supplies and tools for the job. It’s also a good idea to wear protective equipment, including gloves and eye protection when working on your stucco.

Once the prep work is complete, you can apply a coat of caulking or plaster to the area. Make sure to allow the caulking or plaster to dry completely before applying the next coat. Then, use a trowel to smooth out the area and feather edges to ensure a seamless transition into the rest of your stucco.

This type of stucco repair is a relatively easy and manageable project for most homeowners. However, for major or recurring damage that appears on multiple parts of your house’s walls, it might be best to contact a professional stucco inspector to determine if remediation or repair is the best option. They will be able to inspect your entire stucco wall system and recommend the proper course of action for your home. Remediation will include an in-depth inspection, the removal and replacement of sheathing, framing and insulation that are affected by moisture penetration, as well as replastering to correct any issues with the stucco system.

Re-Patching

Stucco’s durability, long life and striking appearance make it a popular choice for exterior walls. However, like any material, stucco requires regular maintenance to avoid damage and prevent water infiltration. While many homeowners opt to hire a professional for major stucco repairs, smaller cracks and holes can be easily remedied with simple stucco patch products.

To determine if your stucco needs re-patching, inspect the damaged area for loose or crumbling fragments and look for signs of moisture penetration. Loose stucco often bulges and feels spongey to the touch. Weak stucco can be identified by tapping gently on the wall with a hammer; intact stucco will sound solid, while weak stucco will give off a hollow or metallic tone.

The first step in re-patching is to clean the hole or cracked area thoroughly with water and a stiff brush. Next, find the underlying cause of the deterioration. Moisture is the main culprit in most stucco failures. It can come from a variety of sources, including poor mixing of the mortar, bad installation, house settlement, and weather conditions. If left unchecked, moisture will rot wood lath and cause the concrete to delaminate, creating a bulge or crack. If it is a large problem, it may be necessary to remove the affected portion of the wall and replace it with new materials.

After cleaning and allowing the hole or cracked area to dry, apply a small amount of pre-mixed stucco mixture with a putty knife. Apply no more than a 1/4″ layer at a time, and make sure the patch is flush with the existing texture. Let the patch set for the length of time recommended by the product manufacturer.

Choosing the best stucco repair caulk for your home is important. There are a wide range of products available on the market, but not all of them are created equal. To ensure the longevity of your stucco, be sure to choose a product with a proven track record. It is also crucial to follow the product instructions carefully.

Once the patch has cured, it is ready to be painted. Make sure to match the color of your stucco and the existing texture to achieve a seamless finish.

Re-Coat

The answer to the question “when should I re-coat stucco?” depends on how long you want the new coating to last and the existing condition of the surface. The typical life expectancy for elastomeric paint is 5 – 10 years. If the current color is starting to fade or the stucco is showing cracking, it may be time to re-coat. It is important to keep in mind that re-coating stucco does not repair the cracking, but it will prolong the life of the surface and will prevent further damage from rain.

It is possible to re-coat your stucco with a good quality product and have it last for years. However, it will require a little more work and attention to detail than simply painting over the existing paint. It is important to properly prep the surface and to follow the manufacturers instructions for application. It is also important to protect all surfaces that are not being painted with plastic, tape and paper. Master Stucco takes the time to do this which saves our customers money by preventing expensive cleanups that could have been avoided.

Once the surface is prepared, a skim coat of the re-coat material should be applied. This is a very thin coat that fills any small cracks and makes the wall look better overall. This coat should be allowed to dry before the final coat of elastomeric paint is applied.

When applying the elastomeric paint it is important to use the correct technique. It is important to use a large enough roller to get the desired coverage and not to apply the material too thick. It is also recommended to use a different roller for each pass, rolling in a different direction each time. This will help the paint blend in and hide any roller marks.

When re-coating stucco it is very important to follow the manufacturers instructions for drying times between coats. It is recommended to allow for 1 – 2 days for each coat of re-coat to dry. Once the final coat of elastomeric is applied it is very important to allow it to dry for up to 24 hours before any cleaning is done.